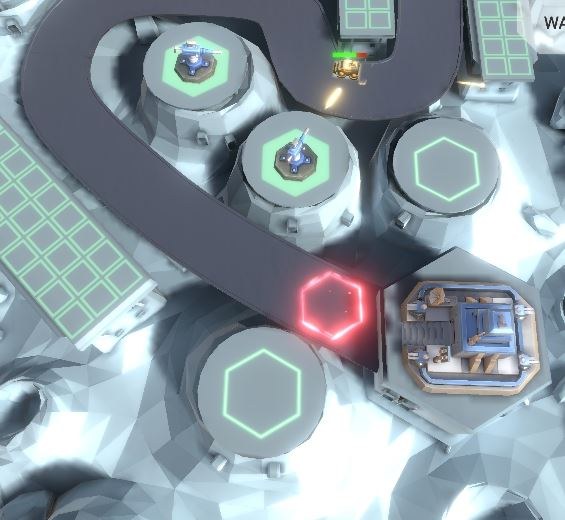
A minimalist browser tower defense where the real game is income acceleration, not survival. You place permanent towers on clean grid maps, funneling enemies into overlapping kill zones while deciding whether to save gold for big upgrades or spend now to stabilize. It suits players who enjoy optimizing layouts and resource timing without story, meta-progression, or flashy effects—and it plays best as a methodical planning experience between waves.
First Contact: What the First Minute Actually Feels Like
You load in and there's no hand-holding. A winding dirt path cuts through a grid of empty squares, and a handful of gold sits in the corner of your screen. The first wave timer is already ticking down from ten seconds. I scrambled to drop a basic arrow tower near the first bend, thumb fumbling on my phone screen because the hitbox for placement felt a touch smaller than I expected. The creeps shuffle in — little blob things, nothing scary — and your single tower plinks away. You'll kill most of them. One or two will slip through, and that's when you realize lives are a resource here, not a failure state. The game doesn't punish you with a game-over screen for leaking a few. It just quietly subtracts from your pool and lets the next wave roll in while you're still staring at your gold counter, wondering if you should save up or drop another low-tier tower right now.
The music, if you can call it that, is this low-key electronic loop that fades into background noise after about forty seconds. The map is clean, almost sterile — green grass tiles, brown path, towers that look distinct enough to tell apart at a glance once you've placed a few. No particle effects vomiting everywhere. No voice lines. Just numbers popping off enemies and the occasional upgrade chime. It's the kind of minimalism that either calms you or bores you to tears, and I found myself landing somewhere in the middle until the difficulty spiked around wave 18 and I was suddenly very awake.
The Loop: What You're Actually Optimizing For
This isn't a game about surviving waves. It's a game about income acceleration disguised as a tower defense. Every creep you kill drops gold. Every wave clear gives you a bonus. The core tension is whether you invest that gold into more towers now — spreading your damage thin but covering more path — or whether you dump it into upgrading two or three key towers to create kill zones that print money faster. I lost my first three runs because I treated it like a survival game, building evenly along the entire path like some kind of responsible city planner. That's wrong. You want one murder corner where three or four towers overlap their ranges, and you want it early enough that the compounding gold from clean wave clears starts snowballing before the mid-game health sponges show up.
There's no branching upgrade trees or skill points. Each tower type has a linear upgrade path — typically three or four tiers — and the cost jumps are steep enough that you'll spend entire waves saving for a single tier-three upgrade while praying your current setup holds. The tower roster feels familiar if you've played any tower defense in the last decade: your basic arrow tower, a slowing ice tower, a splash cannon, a high single-target damage option. They interact in straightforward ways. Slow things down, group them up, hit them with area damage. What makes it interesting is the map layout changes between levels, and the path length varies enough that some strategies that worked on a long winding map will get you killed on a short straight one where enemies reach your base in fifteen seconds flat.
You're also managing a hidden resource I started thinking of as "attention budget." You can only effectively micro-manage so many tower placements and upgrade timings at once. On desktop, clicking between towers to upgrade mid-wave is snappy. On mobile, the tap targets are small and I fat-fingered upgrades more than once, accidentally starting an upgrade on the wrong tower while a wave was actively eating my base. That gold loss cascaded into a dead run two waves later. The game doesn't have a sell button for towers, or if it does I never found it, so every placement is permanent. That permanence is the real optimization puzzle — you're not just spending gold, you're committing to a layout that has to work for the next twenty waves with no take-backs.
Mistakes That End Runs Early
Let me walk you through the specific ways I watched my runs implode, because knowing these ahead of time will save you the forty minutes of frustration I went through.
Upgrading too wide, too fast. In my second run I had six tier-one towers by wave 10 and felt great about my coverage. Then wave 12 brought armored enemies with double the health of anything before them, and my scattered plink damage couldn't kill a single one before they strolled to the exit. You need at least one tower at tier two by wave 8 or 9, and ideally you're working toward a tier three by wave 15. Concentrate your upgrades on two towers maximum in the early game and let the rest of your towers sit at tier one as support. The gold efficiency of a single tier-three tower is wildly better than three tier-ones spread across the map.
Ignoring the path shape. Each map has natural choke points — spots where the path doubles back on itself, or where a single tower's range circle covers two segments of path at once. If you're not placing your first towers at those intersections, you're leaving damage on the table. On one map with a tight hairpin turn, I put a splash tower right in the crux and it was hitting enemies on both the incoming and outgoing path. That single tower carried me through fifteen waves with minimal support. On the next map I tried the same thing on a gentle curve and watched enemies waltz past with half their health bar intact.
Saving for the wrong upgrade at the wrong time. There's a specific trap around wave 16 or 17 where you'll have just enough gold for a big upgrade if you skip placing anything new for a wave or two. The temptation is real. I did it twice. Both times, the wave I skipped building on was the one that introduced a new enemy type that my current setup couldn't handle, and I leaked six or seven creeps before the wave ended, losing lives I couldn't afford to lose. If you're going to save, do it on a wave you've already seen and know you can handle. Don't gamble on the unknown.
Misplacing your slowing towers. Ice towers or their equivalent need to be positioned so enemies are slowed while they're inside your damage dealers' range, not before they enter it or after they leave. I kept putting slow towers at the very start of the path, thinking I was being clever by debuffing enemies early. All that does is stagger their arrival into your kill zone so they trickle in one at a time instead of clumping up for your splash damage. Put the slow tower in the middle of your kill zone, or slightly before it if the range is generous, so enemies are crawling through the worst of your damage output.
Phone vs Desktop: The Difference Matters
I played about half my runs on an iPhone and half on a laptop browser, and the experience is noticeably different in ways that affect your strategy. On desktop, the precision of a mouse cursor means you can place towers exactly on tile edges to maximize range overlap, and upgrading mid-wave is a quick right-click or hotkey press. You can react to a leaking enemy by dropping an emergency tower in the half-second before it escapes. On mobile, that same emergency placement is slow enough that you're better off letting the leak happen and adjusting for the next wave rather than panic-tapping and misplacing a tower you're now stuck with.
The mobile interface also has a habit of interpreting a tap as a scroll when you're trying to pan the map, especially near the edges of the screen. I dragged my view around accidentally more times than I care to admit. The upgrade buttons sit close enough to the tower selection menu that I once upgraded a tier-one arrow tower to tier two instead of placing the ice tower I meant to buy, and that gold discrepancy cost me the run. If you're playing on a phone, slow down. Do all your building and upgrading between waves, not during them. Treat the wave itself as a hands-off observation period where you're just watching to see if your layout works. On desktop, you can be more active mid-wave if you want, though honestly the game plays fine as a more methodical, between-wave planning experience either way.
One thing I appreciated on both platforms: the game runs in a browser tab with no downloads, no account creation, no ad breaks interrupting waves. There's a banner ad tucked off to the side that I genuinely forgot existed after the first few minutes. For a free browser game, the lack of aggressive monetization is almost disorienting. You just play until you lose or win, and then you start again.
Who Should Bother, Who Should Skip
If you've bounced off tower defense games before because they felt like spreadsheet simulators with pretty graphics, this one won't change your mind. It's stripped down to the mechanical skeleton of the genre, and if optimizing tower placement for maximum gold-per-wave doesn't sound like a good time, you'll be bored by wave 6. There's no story, no characters, no meta-progression between runs that I could find — no skill tree or persistent unlocks that carry over to your next attempt. Each run is a clean slate, which means the only thing you're building is your own understanding of the systems.
That said, if you're the kind of person who played Bloons TD back in the day and kept a mental spreadsheet of upgrade costs, you'll find a lot to like here. The difficulty curve is tuned well enough that you'll probably lose your first few runs around waves 20 to 25, which is right when the enemy health scaling starts outpacing your gold income if you've been inefficient. The satisfaction of finally clearing a map that killed you three times comes entirely from your own improved decision-making, not from grinding out permanent upgrades. That's either deeply rewarding or deeply frustrating depending on your temperament.
People who play games in short bursts on their phone during commutes or lunch breaks might find the wave-based pacing a good fit — you can finish a full run in twenty to thirty minutes, and there's no penalty for closing the tab mid-run and coming back later. The game remembers where you were. People who want deep tower customization with branching upgrade paths and active abilities should look elsewhere. The towers here do one thing each, and they do it in exactly the way you expect.
A Practical Ten-Minute Practice Plan
If you want to skip the part where you slam your head against the mid-game wall for an hour, here's a focused practice routine that targets the specific skills this game tests. This isn't theory — it's the exact sequence I used to go from dying on wave 20 to clearing maps consistently.
Minutes 0–3: Map study before placing anything. When a new map loads, don't touch the tower menu. Pause if the game lets you, or just let the first wave timer tick down while you trace the path with your eyes. Identify every spot where two path segments sit inside the same hypothetical tower range circle. Mark those mentally. Count how many tiles the path covers from entrance to exit — shorter paths mean you need higher single-target damage earlier; longer paths give you more time to let area damage and slows do their work. This habit alone saved me from the "build everywhere evenly" instinct that killed my early runs.
Minutes 3–6: The first three tower placements. Your opening towers should go down in this order: one damage dealer at your best choke point, one damage dealer slightly further down the path to catch leakers, then evaluate. Don't place a third tower until you've watched at least one full wave play out with your first two towers. Where are enemies dying? Where are they surviving longest? Put the third tower where it maximizes time-on-target against the healthiest remaining enemies. If everything is dying cleanly with two towers, save the gold instead.
Minutes 6–8: Upgrade discipline drill. Look at your gold. Look at your towers. Pick exactly one tower that's in the best position and upgrade it to tier two before you place any new towers. This is uncomfortable if you're used to filling the map, but do it anyway. Watch how much faster that single upgraded tower kills compared to your tier-one towers. That damage difference is the entire economic engine of the game, and feeling it firsthand is more convincing than me telling you about it.
Minutes 8–10: The wave 15 checkpoint. Whatever your setup looks like, wave 15 is your first real test. If enemies are leaking more than two or three per wave, your damage concentration is too low and you need to prioritize upgrading an existing tower to tier three over placing anything new. If you're clearing waves perfectly but your gold stockpile is tiny, you've been spending too aggressively and need to let a wave or two pass with minimal investment to build a buffer. By the end of these ten minutes, you should have a clear sense of whether your current layout can scale into the late game or whether you're already dead and just don't know it yet.
After that, you're into the mid-game and the decisions get more contextual — enemy types start varying more, and you'll need to read whether the next wave calls for more single-target damage or more crowd control. But the fundamentals from those first ten minutes carry through the entire run, and nailing them consistently is what separates clearing wave 30 from dying on wave 22 for the fifth time in a row.